Streamlit your Data Science application into AWS

To check a more advanced real world application developed using these guidelines please consider visiting this repository
Have you ever seen those fancy Data Science web apps that include interactive plots, Machine Learning inference in realtime and custom user inputs? Well, I have and I was always wondering how they were built. I mean, I’m sure that a whole team of front-end engineers, data engineers and data scientists could create something like that, but I was always looking for a simpler solution. And then I found Streamlit.
What is Streamlit?
Streamlit is a Python framework that allows you to deploy Data Science applications in the form of Python scripts, dealing with the back and most of the front-end nuances for you. It’s a great tool for Data Scientists that want to share their work with the world, but don’t want to spend too much time dealing with web development.
It also includes a Cloud service to host your applications, which is great for a personal project or a small team. But what if you want to deploy your application to a bigger audience or you are concerned about privacy and security issues? Well, you can do that too, but you’ll need to use AWS, which we will talk about later.
How does it work?
Streamlit is a Python framework, so you’ll need to install it in your environment. You can do that by running the following command:
pip install streamlit
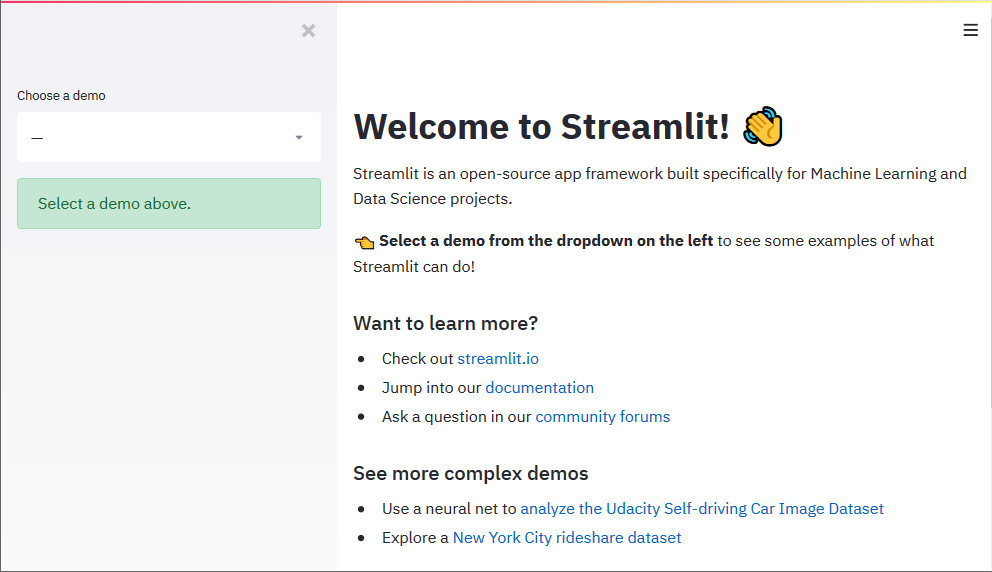
If we run streamlit hello we will be able to see how we have a running web application on our localhost, and with 0 code! Sure enough, our custom Data Science applications will not be so easy to create or simple to use, but the key elements are there.
Creating a Streamlit application
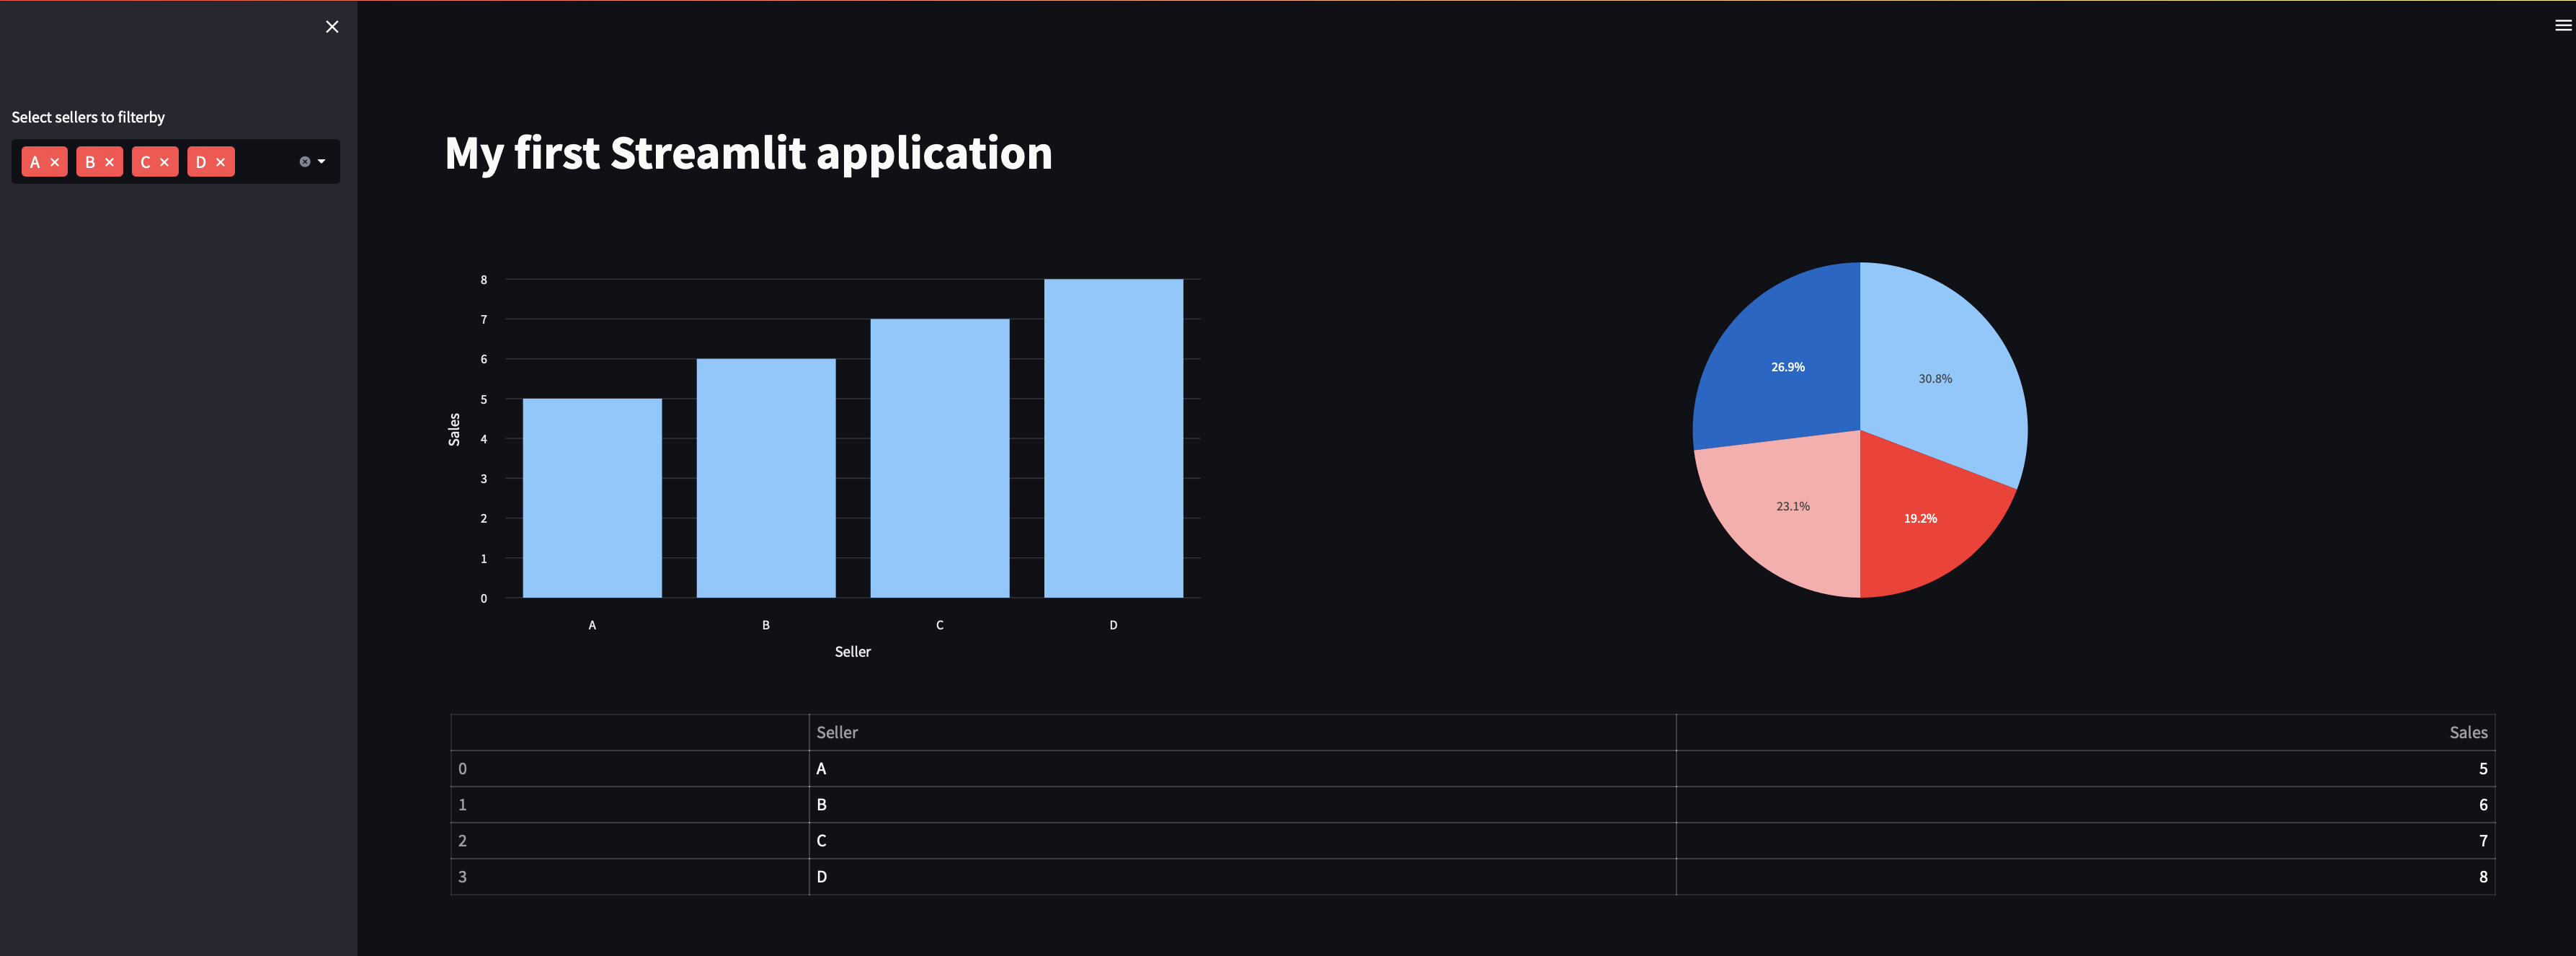
There are several commands that we can use to create a Streamlit application, being the most important ones explained in the Cheat Sheet. As we will progress building our app, I’ll leave some comments in the code to explain what is going on:
import pandas as pd
import streamlit as st
import plotly.express as px

# Sets the page layout to wide and creates a title
st.set_page_config("My dummy Streamlit App", None, "wide")
# Creates a h1 title
st.title("My first Streamlit application")

# Creates a DataFrame
df = pd.DataFrame({
    'Seller': ["A", "B", "C", "D"],
    'Sales': [5, 6, 7, 8]
})

# Creates a sidebar with a multiselect widget
sellers_to_filter = st.sidebar.multiselect(
    "Select sellers to filterby",
    [seller for seller in df["Seller"].unique()],
    [seller for seller in df["Seller"].unique()],
)
filtered_df = df[df["Seller"].isin(sellers_to_filter)]

# Creates 2 columns for plots
col1, col2 = st.columns(2)

# Creates a bar chart
col1.plotly_chart(px.bar(filtered_df, x="Seller", y="Sales"))

# Creates a pie chart
col2.plotly_chart(px.pie(filtered_df, values="Sales", names="Seller").update_layout(showlegend=False))

# Displays the DataFrame as a table
st.table(filtered_df)
While we iterate through our perfect web app, we can use the following command to see the changes in real time:
streamlit run app.py
Containerizing our application
Now that our app is complete and we are happy with the results of this first iteration, we can start to think about how to deploy it. As we mentioned before, we could use Streamlit Cloud to host our application, but we will use AWS to have more control over our application and to be able to scale it in the future.
Although we could deploy our application as a script directly in an EC2 instance, it’s advised to containerized it. This way, we can easily deploy it in any environment and we can also scale up to Kubernetes if needed, for example, or collaborate easier with other teams.
To containerize our application, we will use Docker. We will install Docker and create a Dockerfile with the following content:
FROM python:3.9

EXPOSE 8501

WORKDIR /app

RUN apt-get update && apt-get install -y \
    build-essential \
    software-properties-common \
    git

COPY ./requirements.txt /app/requirements.txt

RUN pip3 install --upgrade pip && pip install -r requirements.txt
And we will also create a docker-compose.yml file with the following content to manage our image and prepare it to include further services if needed:
version: "3.9"
services:
  my-app:
    build:
      context: .
      dockerfile: ./Dockerfile
    volumes:
      - $HOME/.aws/config:/root/.aws/config
      - $HOME/.aws/credentials:/root/.aws/credentials
    command: streamlit run app.py --server.port=8501 --server.address=0.0.0.0
    restart: always
    ports:
      - 8501:8501
We can test our application in local using the following command on the root of our project:
docker-compose up
This should have opened a port 8501 in our localhost, where we can see our application running.
Deploying our application
AWS Configuration
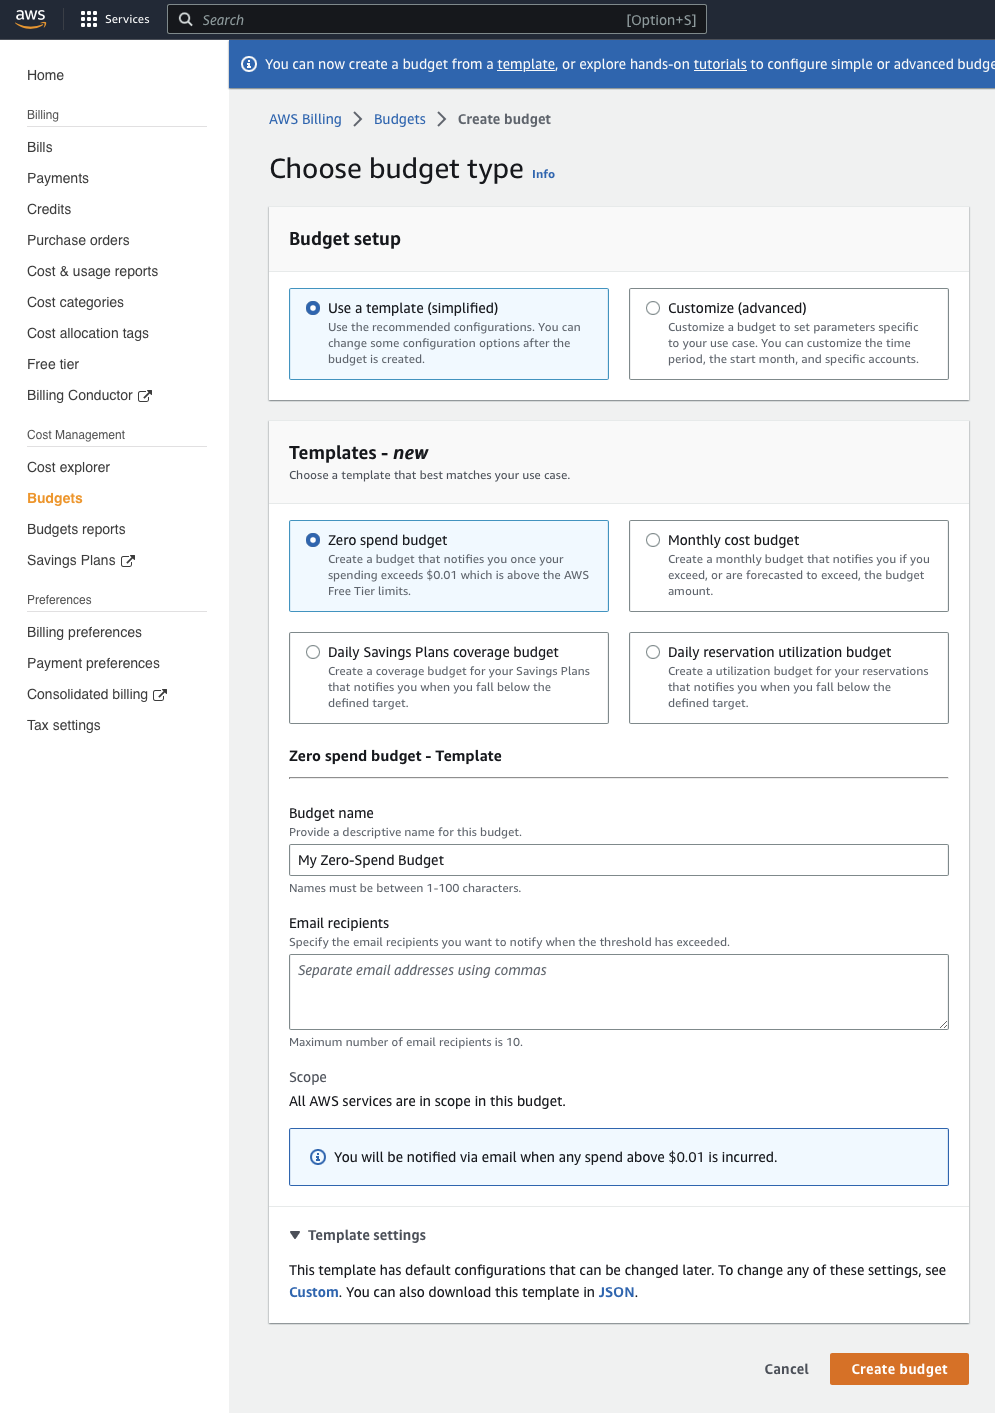
In order to deploy our application in AWS, we first need to create an AWS account. If you don’t have one, you can create one here. Please consider that we will only be using the free tier offered by Amazon (more info) to avoid extra costs with our examples. To create an alert in case you surpass the free tier usage go to Account Settings > Budgets > Create Budget and select the Zero spend budget template:
Then we can create a Group and a IAM user following the instructions here, downloading the secret key and the access key. We will need these credentials to connect to our AWS account programmatically.
Once you have your account, you can create an EC2 instance. We recommend using t2.micro with Amazon Linux for testing due to the low cost, but you can use a bigger instance if you want to scale up your application.
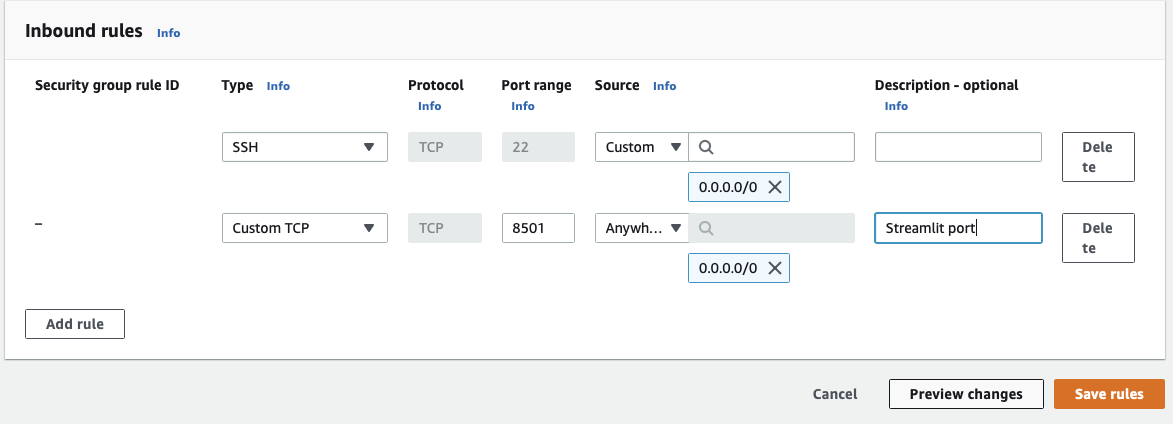
On the Security Group configuration, we need to expose the port that’s going to be used for our application, which in this case will be the 8501. We also need to add a rule to allow SSH access to our instance, so we can connect to the instance later. On this step, it’s also important to create a key pair to authenticate our connection while connecting to the instance via SSH.
Once our EC2 is configured, feel free to run it using the AWS console so we can properly used it.
Connecting to the EC2 instance
Now that our EC2 instance is running, we can connect to it using SSH. We can do that by running the following command:
ssh -i <path-to-key-pair> ec2-user@<public-ip>
Installing Docker in EC2
Once we are connected to our EC2 instance, we need to install Docker. We can do that by running the following commands:
sudo yum update -y
sudo amazon-linux-extras install docker
sudo service docker start
sudo usermod -a -G docker ec2-user
And now we just need to download the code from our repository and build the image:
git clone <git-repository-url>
cd <project-name>
docker-compose up
Adding security to our application
Streamlit can be integrated with SSOs such as OKTA and it’s the recommended option for production environments. However, it also offer different alternatives for use cases without SSO.
The first alternative would be to use the .streamlit/secrets.toml file to store our credentials and later on check for the contents of this file in our application. An example of this integration, following the code in the Streamlit guidelines, could be the following:
# .streamlit/secrets.toml

[passwords]
# Follow the rule: username = "password"
alice_foo = "streamlit123"
bob_bar = "mycrazypw"
# app.py
import streamlit as st

def check_password():
    """Returns `True` if the user had a correct password."""

    def password_entered():
        """Checks whether a password entered by the user is correct."""
        if (
            st.session_state["username"] in st.secrets["passwords"]
            and st.session_state["password"]
            == st.secrets["passwords"][st.session_state["username"]]
        ):
            st.session_state["password_correct"] = True
            del st.session_state["password"]  # don't store username + password
            del st.session_state["username"]
        else:
            st.session_state["password_correct"] = False

    if "password_correct" not in st.session_state:
        # First run, show inputs for username + password.
        st.text_input("Username", on_change=password_entered, key="username")
        st.text_input(
            "Password", type="password", on_change=password_entered, key="password"
        )
        return False
    elif not st.session_state["password_correct"]:
        # Password not correct, show input + error.
        st.text_input("Username", on_change=password_entered, key="username")
        st.text_input(
            "Password", type="password", on_change=password_entered, key="password"
        )
        st.error("😕 User not known or password incorrect")
        return False
    else:
        # Password correct.
        return True

if check_password():
    # Here comes the main content of our application
Even though we can use this approach, it’s not recommended to store our credentials in plain text. We can use AWS Secrets Manager to store our credentials and retrieve them in our application. This way, we can avoid storing our credentials in plain text and we can also use the same credentials for different applications. This approach is a little bit more complex, but I find it to be much more secure.
After registering our secret in AWS Secrets Manager, we can retrieve and store it in our application session state by using code like the following:
import ast
import boto3
import botocore

def state_password_dict(secret_name: str, region_name: str):
    session = boto3.session.Session()
    client = session.client(service_name="secretsmanager", region_name=region_name)

    try:
        get_secret_value_response = client.get_secret_value(SecretId=secret_name)
        secret_string = get_secret_value_response["SecretString"]
        secret_dict = ast.literal_eval(secret_string)
        st.session_state["secret_dict"] = secret_dict
    except botocore.exceptions.ClientError:
        # if secret not found then create empty dict
        st.session_state["secret_dict"] = {}
Later on, instead of checking the credentials given by the user against those in st.secrets, we can check them against the credentials stored in our session state by using st.session_state["secret_dict"] instead.
Consider that in order to use this code we need to have in our EC2 instance the AWS config files and add them to our Docker image. You can find more information about this in the AWS documentation. Go ahead and check our
docker-compose.ymlfile to see how we did it.
Final remarks
Even though this guide was more focused on AWS, I hope it has illustrated how to easily deploy a ML application in the cloud. No matter which service or framework you use, at the end of the day the core concepts such as containerization and deployment are very similar regardless of our vendor choices.
It’s true that Streamlit provide us a friendly framework to create our applications, but it’s also true that we need to be aware of the security and privacy issues that we are facing when deploying our code in the cloud. Some DevOps knowledge always come in handy when dealing with these issues, alongside with a good understanding of the cloud services that we are using.
I hope that this guide has helped you to understand how to deploy your ML application in the cloud, and we hope to see you soon in our next post!